> For the complete documentation index, see [llms.txt](https://docs.roadmap.so/llms.txt). Markdown versions of documentation pages are available by appending `.md` to page URLs; this page is available as [Markdown](https://docs.roadmap.so/reviews/storefront-and-display/customise-review-widget-design.md).
# Customise review widget design
This page explains how to customise the design of your review widget using the in-app **Review Form** editor — including layout choices, section visibility, ordering, and the content shown to shoppers.
{% hint style="info" %}
Want your review widgets to match the rest of your Roadmap blocks in one action? The [Universal Styler](/getting-started/how-the-universal-styler-works.md) applies your brand colors, border radius, and typography across every Roadmap block at once, including the **Reviews PDP Block** and **Reviews Form**. Use this page for the review-specific layout and content settings on top of that base.
{% endhint %}
### Open the review widget editor
Go to Review Form
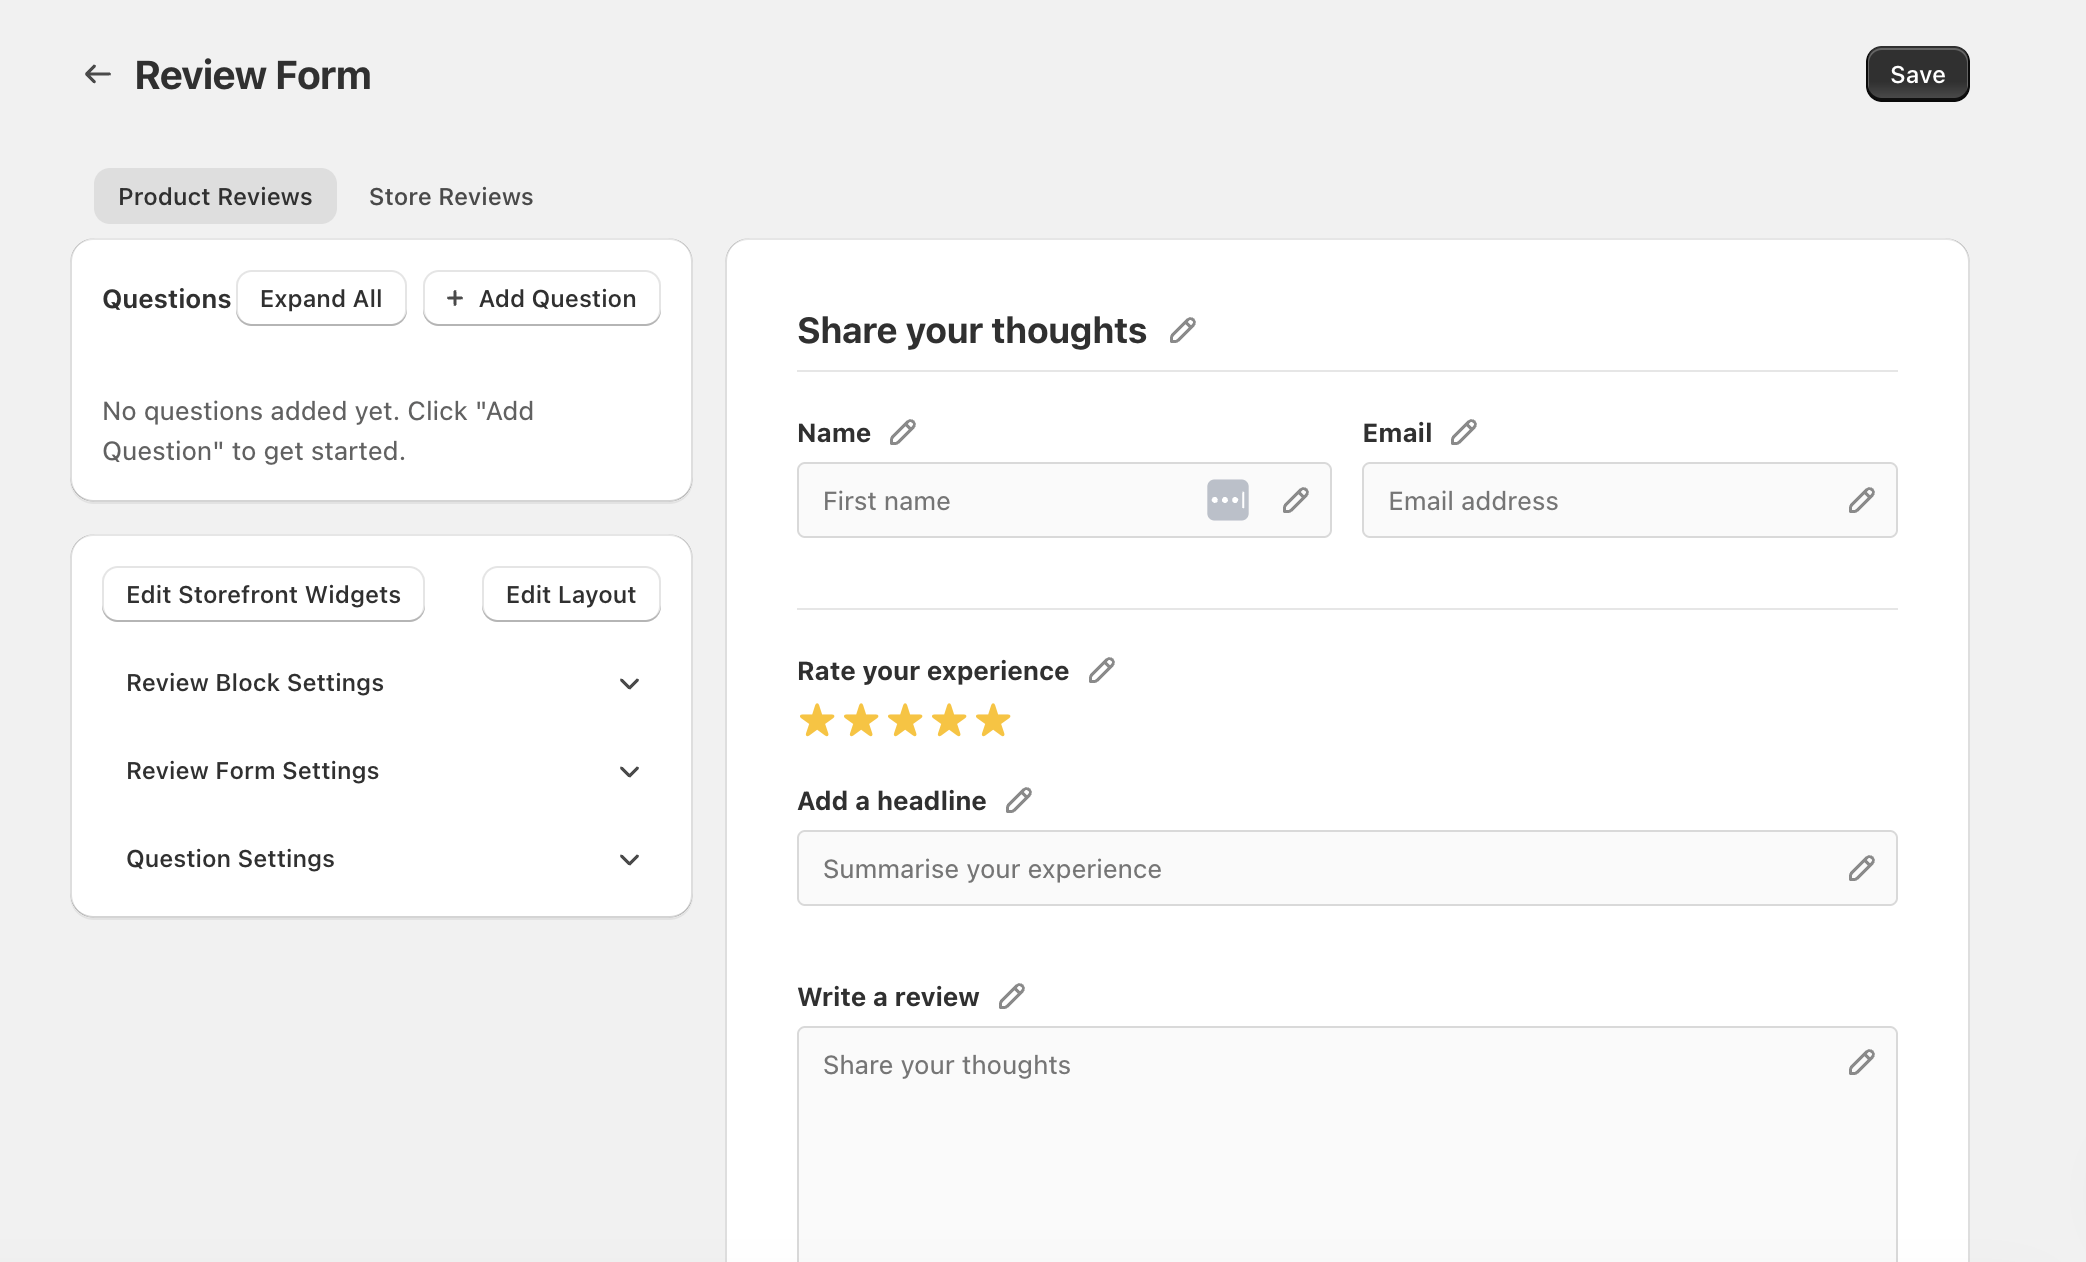
* In your admin, open **Review Form**. At the top, choose whether you’re editing **Product Reviews** or **Store Reviews**.
Use the live preview
* Use the preview on the right (e.g., **Share your thoughts**, **Rate your experience**, **Add a headline**, **Write a review**) to see design changes as you make them.
Save your changes
* Click **Save** in the top-right of the page to apply your updates. Some settings affect only **Product Reviews** or only **Store Reviews**. Always confirm the correct tab is selected before you save.\\
### Choose a layout (Block vs Columns)
You can switch the overall widget layout using **Edit Layout**. This changes how the review summary, image (optional), and review list are arranged on the page.
* Click **Edit Layout**.
* Choose a layout card such as **Block** or **Columns**, then click **Use This Layout** on the option you want.
* In the layout modal, click **Save**.

If you want a more editorial look (large image alongside reviews), **Columns** is usually the best starting point.
### Customise what appears (and in what order)
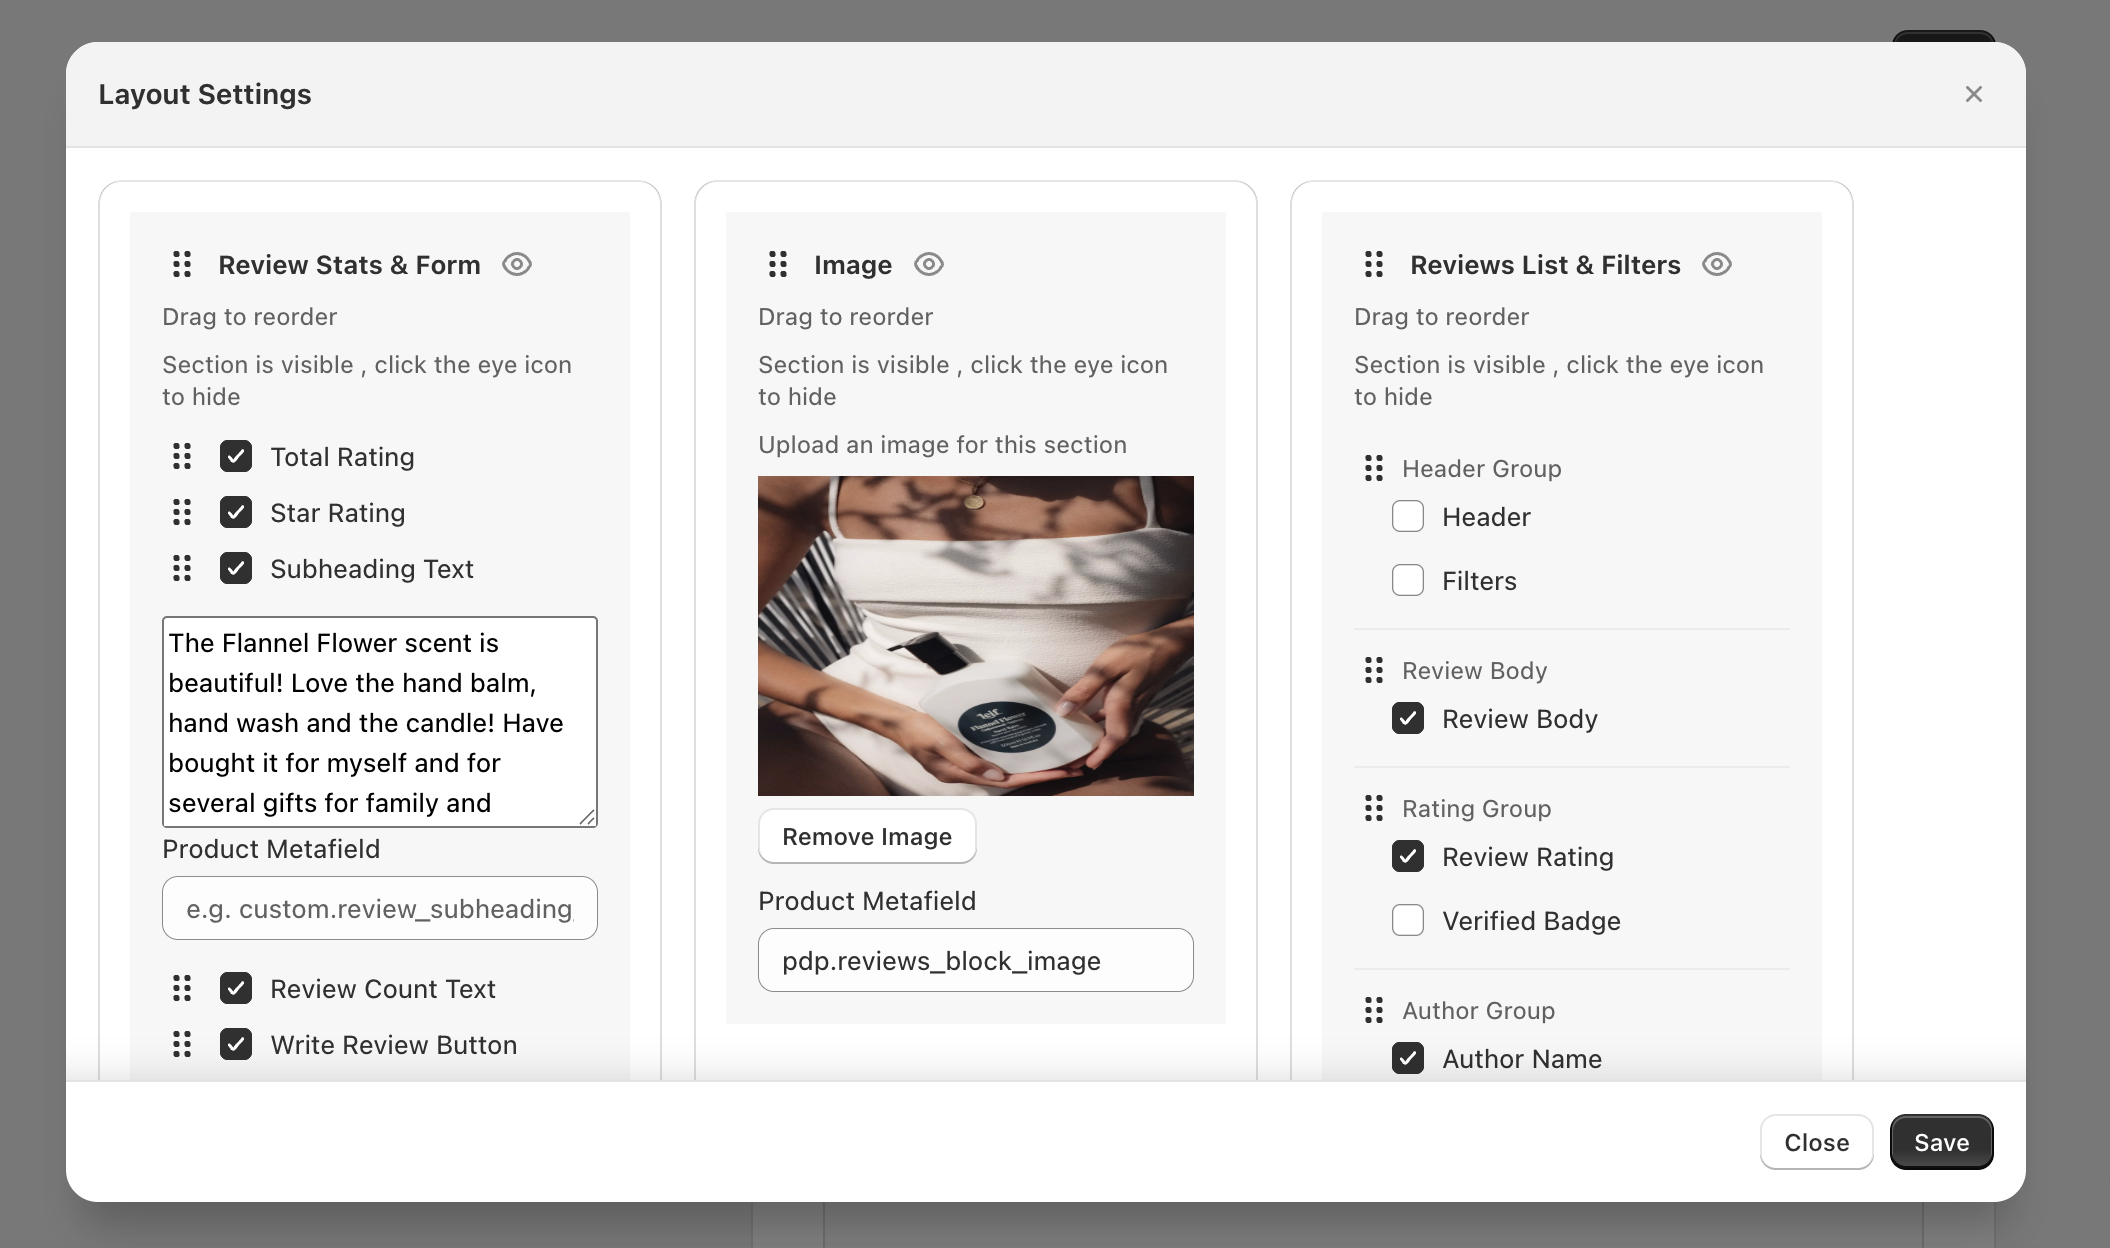
After you’ve chosen a layout, use **Layout Settings** to show/hide sections, reorder them, and configure what content appears inside each section.
### Reorder sections
* In **Layout Settings**, drag sections using the **drag handle** (the dotted/grip icon) next to a section title (for example: **Review Stats & Form**, **Image**, **Reviews List & Filters**).
* Drag to rearrange where each section appears in the widget.
### Show or hide a section
* Click the **eye** icon next to a section title to hide/show that entire section.
* Within sections, use the **checkboxes** to show/hide individual items (for example: **Total Rating**, **Star Rating**, **Review Body**, **Review Rating**, **Verified Badge**).
### Add an image section (optional)
If your layout includes an **Image** section, you can either upload an image or connect the section to a product metafield:
* Click **Upload an image for this section** to choose a static image.
* Or use **Product Metafield** to pull an image dynamically per product (for example, the field shown as `pdp.reviews_block_image` in the editor).
If you use a **Product Metafield** for the image section, make sure your products have that metafield populated — otherwise the image area may appear blank on some product pages.
### Configure the review list and filters
In **Reviews List & Filters**, you can control which parts of the review list are visible, such as:
* **Header Group**: **Header** and **Filters**
* **Review Body**: **Review Body**
* **Rating Group**: **Review Rating**, **Verified Badge**
* **Author Group**: e.g., **Author Name**
### Customise the form labels and questions
The left-hand settings panels in **Review Form** control the look and wording of what shoppers see.
* Review Block Settings\
Open **Review Block Settings** to adjust what appears in the main review block (summary/content shown around the widget depending on your layout).
* Review Form Settings\
Open **Review Form Settings** to edit form text and fields — such as the heading (**Share your thoughts**) and the labels shown in the preview (e.g., **Name**, **Email**, **Add a headline**, **Write a review**).
* Question Settings\
Open **Question Settings** to manage any custom questions you want to ask. Use **+ Add Question** to create new questions.
Use the preview pencil icons (edit indicators) next to headings/labels to quickly spot which text is editable from your settings.
### Publish your design changes
* When you’re happy with the layout and settings, click **Save** (top-right) on the **Review Form** page.
* If you used a layout modal, ensure you also clicked **Save** inside that modal before closing it.
If you’re changing where the widget appears on your storefront, use **Edit Storefront Widgets** (next to **Edit Layout**) to manage widget placement separately from its design.
Why don’t I see my changes on the storefront?
* Confirm you clicked **Save** on the **Review Form** page (top-right).
* If you changed layout, confirm you clicked **Save** in the **Edit Layout** / **Layout Settings** modal.
* Make sure you edited the correct tab: **Product Reviews** vs **Store Reviews**.
What does “Product Metafield” do in Layout Settings?
**Product Metafield** lets you pull per-product content into the widget (for example, an image). This is useful when you want the review widget to match each product’s branding or imagery.

---
# Agent Instructions
This documentation is published with GitBook. GitBook is the documentation platform designed so that both humans and AI agents can read, navigate, and reason over technical content effectively. Learn more at gitbook.com.
## Querying This Documentation
If you need additional information that is not directly available in this page, you can query the documentation dynamically by asking a question.
Perform an HTTP GET request on the current page URL with the `ask` query parameter, and the optional `goal` query parameter:
```
GET https://docs.roadmap.so/reviews/storefront-and-display/customise-review-widget-design.md?ask=&goal=
```
`ask` is the immediate question: it should be specific, self-contained, and written in natural language.
`goal` is optional and describes the broader end goal you are ultimately trying to accomplish on behalf of the user. GitBook uses it to tailor the answer towards what is most useful for that goal.
The response will contain a direct answer to the question and relevant excerpts and sources from the documentation.
Use this mechanism when the answer is not explicitly present in the current page, you need clarification or additional context, or you want to retrieve related documentation sections.